


 Damage
  Loss
Loss  Theft
Theft 


How to Use a Plate Compactor for Paver Installation
A Step-by-Step Guide for Professional Results
For long-lasting and visually stunning paver installations on patios, driveways, or walkways, proper compaction is non-negotiable. Whether you are a seasoned contractor or a dedicated DIY homeowner, mastering the plate compactor technique will dramatically improve the quality and durability of your paver project. This comprehensive guide walks you through every stage of the process, from initial preparation through final finishing.
Why Compaction Is Crucial in Paver Installation
Taking time to understand the critical role of compaction in paver installation sets the foundation for a successful project. Proper compaction delivers multiple benefits that directly impact both the appearance and longevity of your finished work.
Enhanced Load Capacity — Increases bearing capacity of the soil and base materials
Reduced Water Problems — Minimizes water penetration and frost heave issues
Improved Lifespan — Significantly extends the durability of the project
Better Surface Quality — Creates a more uniform and stable finished surface
A properly sized plate compactor can exert forces up to 4,000 pounds per square foot, ensuring maximum density and stability. With proper compaction, your paver project will resist heaving, sinking, and shifting for years to come.
Choosing the Right Plate Compactor for Pavers
As a general guideline, selecting a compactor based on your specific application ensures optimal results. Look for plate compactors with centrifugal force in the range of 3,000 to 5,000 pounds and forward speeds of approximately 65 to 80 feet per minute.
| Application | Plate Size | Weight Class |
|---|---|---|
| Walkways | 14" - 18" | 150 - 200 lbs |
| Patios | 18" - 20" | 200 - 300 lbs |
| Driveways | 20" - 24" | 300+ lbs |
| Commercial Areas | 24"+ | 400+ lbs |
Using a plate compactor correctly for paver installations requires careful attention to quality equipment and following the right process. At BACKYARD PROVIDER, our specialists have tested and selected compactors that deliver professional-grade results while remaining accessible to homeowners and contractors alike.
Gather Tools and Materials
Essential Tools
Materials Needed
Prepare the Subgrade
Beneath the paver project lies the natural soil or subgrade. Proper preparation of this layer is essential to avoid future settling and shifting that would compromise your installation.
Instructions:
Excavate the area to the desired depth, typically 8 to 12 inches for patios and walkways, increasing to 12 inches or more for driveways.
For clay soils, make sure the slope is appropriate at 1/8 inch per foot to encourage proper drainage and avoid water pooling.
Remove debris, rocks, and any loose soil, using a rake or shovel to create a uniform surface.
Compact the native soil using the plate compactor in two or three passes, depending on soil type. Clay soils typically require additional attention.
Pro Tip: Moistening the soil slightly helps the compaction process produce better results. Avoid over-saturating which can lead to mud.
Install the Sub-Base Layer
The sub-base is typically composed of crushed gravel or crushed stone with angular edges that lock together creating a stable foundation for your pavers.
Instructions:
Apply the sub-base material in 2 to 3 inch layers.
Rake out the material to create an even layer across the entire area.
Moisten the sub-base compactor to increase density, then thoroughly moisten before rolling the area.
Repeat until you reach the desired sub-base depth of 4 to 6 inches for walkways or up to 8 inches for driveways.
Pro Tip: Use the plate compactor in an overlapping pattern for uniform results. Run north-south, then east-west for full coverage.
Install The Base Layer
Some installers use a separate base layer of finer aggregate or continue with the same sub-base material and continue with the same process.
Instructions:
Add another 1 to 2 inch layer of base aggregate if needed.
Level the surface using straight edges or aluminum screeds.
Compact using the plate compactor until you reach maximum density and the base feels firm underfoot.
Set Screed Rails and Add Bedding Sand
The bedding layer allows pavers to sit evenly and firmly and is critical for a finished surface that looks professional.
Instructions:
Lay screed rails (metal pipes or wooden boards) approximately 6 feet apart and level them the full width of your project.
Add sand and between the rails and level it with the screed board by dragging it toward you.
Remove the rails and fill gaps with additional sand.
Do NOT compact the bedding sand as it should remain loose for the pavers to settle into properly.
Pro Tip: Bedding sand should be 1 inch deep when loose to ensure proper settling after compaction.
Lay the Pavers
Now it's time to lay the pavers on the bedding layer following your chosen pattern for the best visual impact.
Instructions:
Start from a corner or straight edge and lay pavers in your chosen pattern.
Place each paver gently on top of the sand and tap down firmly with the rubber mallet.
Check alignment and spacing regularly to maintain a uniform appearance.
Use a rubber mallet to adjust the paver height as you lay them in place.
Pro Tip: Use spacers if your pavers don't have built-in lugs to maintain consistent joint widths.
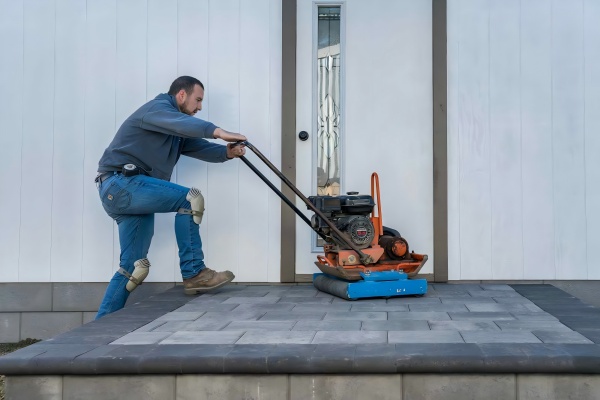
Compact the Pavers (Initial Pass)
After all pavers are in place, it's time for the initial compaction pass to settle them firmly into the bedding sand.
Instructions:
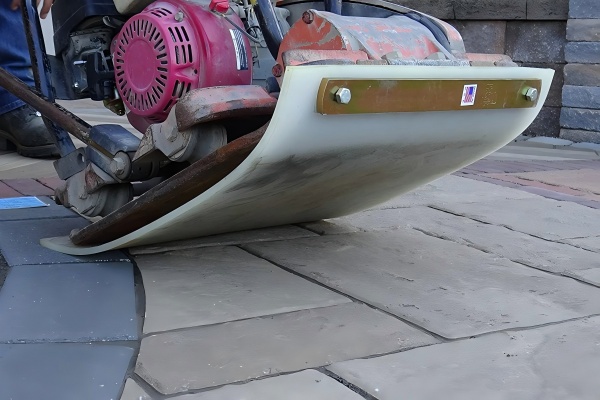
Attach a rubber pad or mat on the base of the plate compactor to avoid chipping the paver surface.
Compact the entire surface in passes, covering the entire area in a uniform pattern.
Check for any pavers or sunken areas and adjust. Then flatten any remaining irregularities in this first step.
This initial pass settles the pavers into the bedding sand and helps identify any high or low spots that need attention.
Add Joint Sand
Joint sand fills the gaps between pavers, locking them together and preventing movement over time.
Instructions:
Spread dry joint sand over the compacted pavers using a broom.
Sweep the sand into the joints with a soft-bristle broom until each joint is filled completely.
Continue spreading and compacting the sand until all of the joints are filled and compacted.
Sand Type Tip: For improved joint stability and weed resistance, use polymeric sand. Just follow the manufacturer's instructions carefully for best results.
Final Cleaning and Sealing (Optional)
Finishing touches make the difference between a good installation and a great one that will stand the test of time.
Instructions:
Allow the compaction and joint sand application to sit for a few days.
Rinse or sweep off the excess sand.
Hose off lightly if needed.
Consider applying a paver sealer to enhance color, add protection, and protect pavers from stains and UV damage. Always follow the manufacturer's recommendations for proper curing time before sealing.
Safety and Operational Tips for Using a Plate Compactor
Proper safety practices protect both you and your equipment while ensuring the best possible results.
Wear safety gear including eye protection, hearing protection, gloves, and steel-toed boots.
Inspect the machine before each use to check for damage or wear.
Let the machine warm up before using it on your project.
Keep hands and feet clear of the plate during operation.
Maintain a firm grip and stable stance while operating.
Never operate on slopes exceeding the manufacturer's recommendations.
Common Mistakes to Avoid
Skipping compaction of subgrade or base layers results in poor settlement and uneven surfaces.
Compacting without a rubber mat on pavers causes damage, chips, and scratches to paver surfaces.
Overwatering during sand application causes the compactor to stick and creates an uneven surface.
Using the wrong size compactor for the job leads to poor results or equipment issues.
Not allowing enough curing time before sealing causes sealer failure and premature wear.
Ready to Start Your Paver Project?
Get professional-grade equipment for outstanding results on your next outdoor installation project.
Bartell Vibratory Paver RollerFinal Thoughts
Using a plate compactor correctly for paver installation transforms an average project into a professional-quality finished product that will last for decades. By following this step-by-step guide and using quality equipment, you'll achieve a stable, beautiful surface that resists settling, shifting, and weathering. Whether you're creating a welcoming patio, a functional driveway, or a charming garden walkway, proper compaction technique is the foundation of lasting success.