


 Damage
  Loss
Loss  Theft
Theft 


Installation, Setup & Maintenance Care for Commercial Fridges
Looking for a Commercial Fridge? Commercial refrigerators are built for heavy-duty use. Getting the installation, setup, and ongoing maintenance right is essential for peak performance and longevity.
This guide walks you through every essential aspect of working with commercial fridges — from the initial installation process and proper configuration to long-term maintenance care. Whether you're outfitting a restaurant kitchen, stocking a convenience store, or upgrading a warehouse cold storage setup, correct installation, thoughtful setup, and consistent maintenance are the three pillars that determine how well your commercial fridge performs over the years.
Installation
Choosing the right location, ensuring proper ventilation, and meeting all electrical requirements from the start.
Setup
Configuring temperature controls, adjusting shelving, and calibrating the unit for optimal food safety.
Maintenance
Regular cleaning, condenser care, and preventative routines that extend the lifespan of your investment.
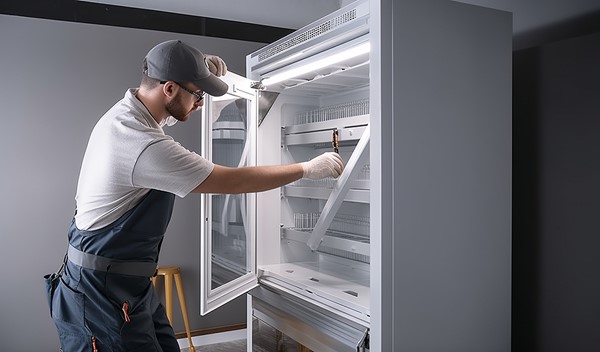
Installation
Proper installation lays the groundwork for everything else. A commercial fridge that's poorly placed, improperly ventilated, or connected to the wrong electrical source will underperform from day one, costing you more in energy and repairs than it should.
Key Installation Considerations
Location: Select a stable, level surface for the commercial fridge that provides adequate room for proper airflow around all sides. Keep it away from direct sunlight, heat-generating appliances like ovens and grills, and any moisture-prone areas. Environmental conditions in the surrounding space will directly affect how hard the compressor has to work.
Ventilation: Allow sufficient clearance behind and on both sides of the unit. Most manufacturers specify a minimum gap — typically between two and six inches — to facilitate proper heat dissipation from the condenser. Inadequate airflow forces the compressor to run longer cycles, increasing energy consumption and shortening the life of the unit.
Electrical Requirements: Ensure the unit is connected to the correct power supply as specified by the manufacturer. Most commercial refrigerators require a dedicated circuit to prevent voltage fluctuations and tripped breakers. Verify the amperage, voltage, and plug configuration before connecting the unit.
Clearance: Allocate enough surrounding clearance so that doors open fully and staff can access the interior for loading, unloading, and cleaning without obstruction. Planning for adequate clearance also simplifies future maintenance and part replacements.
Tips for Proper Installation of Your Commercial Fridge
Getting the installation right the first time saves you from headaches down the line. A few deliberate decisions early on will protect your commercial fridge's efficiency and help maintain consistent temperatures throughout its service life.
Allow Sufficient Space
Ensure there is enough room around the fridge for air to circulate freely. The condenser needs unobstructed airflow to release heat. Cramped spaces lead to overheating and premature component failure.
Level the Unit Precisely
Use a spirit level and adjust the feet of the fridge until it sits perfectly even. An unleveled fridge causes doors to seal improperly, leads to pooling condensation, and puts uneven stress on the compressor.
Protect the Electrical Supply
Plug your commercial fridge into a dedicated, grounded outlet that matches the manufacturer's specifications. Avoid extension cords and power strips. A surge protector rated for commercial appliances is strongly recommended.
Keep Away from Heat Sources
Position the unit well away from ovens, stoves, dishwashers, and heating vents. Ambient temperatures above the designed range will force the compressor into overdrive, wasting energy and accelerating wear on internal parts.
Inspect Upon Delivery
Before completing the installation, thoroughly inspect the unit for any shipping damage — dents, loose parts, damaged gaskets, or bent shelving. Document and report issues immediately to the supplier.
Check Ventilation Systems Nearby
Confirm that the kitchen or storage room ventilation is adequate to handle the additional heat output from the fridge's condenser. Poor room ventilation compounds the problem and can raise the ambient temperature for all nearby equipment.
Electrical Requirements for Your Commercial Fridge
Understanding the electrical requirements for your commercial fridge is non-negotiable. Connecting the unit to an improper power source is one of the fastest ways to void a warranty, damage internal components, and create a safety hazard in your workspace.
Voltage: Most commercial fridges in North America operate on either 115V or 230V circuits. Always verify the voltage rating on the unit's data plate before plugging it in. Connecting a 115V unit to a 230V source — or vice versa — can cause immediate and irreversible damage to the compressor and electronic controls.
Dedicated Circuit: A commercial refrigerator should always have its own dedicated electrical circuit. Sharing a circuit with other appliances creates voltage drops and current spikes that interfere with the compressor's operation and trigger frequent breaker trips.
Grounding: Proper grounding is a safety essential. The unit must be connected to a grounded outlet that meets local building codes. Improper grounding increases the risk of electrical shock and can interfere with the electronic thermostat and control board.
Surge Protection: Install a commercial-grade surge protector to guard against power surges and voltage spikes that can fry the fridge's compressor and electronic components. This is especially important in areas prone to electrical storms or unstable utility grids.
Outlet Type: Make sure the outlet configuration matches the plug type on the unit. Standard NEMA configurations differ between 115V and 230V appliances. Do not modify the plug or use adapters — have an electrician install the correct outlet if needed.
Find the Right Commercial Fridge
Explore our selection of high-performance commercial refrigeration units built for demanding environments.
Chef AAA - TSM33R Merchandiser RefrigeratorSetup
Once your commercial fridge is physically installed and connected to power, the setup phase begins. This is where you configure the unit to meet the specific needs of your operation — setting the right temperature, arranging the shelving, and ensuring the door seals are intact.
Temperature Settings
Set the thermostat to the appropriate range for what you're storing. For most perishable goods, this means keeping the internal temperature between 33°F and 40°F (0.5°C to 4.4°C). Use a separate calibrated thermometer to verify accuracy — don't rely solely on the built-in display. Allow the unit to reach its target temperature before loading any product inside.
Shelves and Compartments
Adjust shelf heights and positions based on the sizes of the products you need to store. Avoid overloading shelves, and always leave enough space between items for cold air to circulate effectively. Blocked airflow creates warm pockets that compromise food safety.
Door Gaskets and Seals
Inspect the door gaskets carefully. They should form a tight, uniform seal around the entire perimeter when the door is closed. Gaps or tears in the gasket allow cold air to escape and warm air to enter, forcing the compressor to work harder and raising your energy bill.
Initial Stocking
When first loading the fridge, do so gradually rather than filling it to capacity all at once. A sudden heavy load forces the compressor to run extended cycles to bring the mass of product down to the target temperature. Staggering the load allows the unit to stabilize more efficiently.
Maintenance Care
Routine maintenance is what separates a commercial fridge that lasts three years from one that runs strong for a decade or more. A consistent maintenance schedule keeps your unit performing at peak efficiency, prevents costly breakdowns, and ensures you remain in compliance with health and safety regulations.
Regular Cleaning
Establish a cleaning routine and stick to it. Clean the interior surfaces, shelves, and drawers with a mild detergent at least once a week. Wipe down the exterior and handles daily in high-traffic environments. Regular cleaning prevents bacterial buildup and keeps the unit looking professional.
Condenser Coil Maintenance
The condenser coils are arguably the most important component to maintain. Dust, grease, and debris accumulate on the coils over time, forming an insulating layer that reduces heat transfer efficiency. Clean the coils at least once every three months — more often in dusty or greasy kitchen environments. A coil brush or compressed air makes this task straightforward.
Defrosting
If your unit doesn't have an automatic defrost feature, schedule manual defrost sessions on a regular basis. Frost buildup on the evaporator coils acts as an insulator, reducing cooling efficiency and making the compressor work harder. Even units with auto-defrost should be checked periodically to confirm the system is cycling properly.
Temperature Monitoring
Monitor the internal temperature of your commercial fridge daily using a calibrated thermometer or digital temperature logger. Sudden fluctuations can indicate failing components — a compressor struggling to maintain setpoint, a faulty thermostat, or a refrigerant leak. Catching these issues early prevents food spoilage and expensive emergency repairs.
Door Gasket Inspection
Inspect door gaskets regularly for signs of wear — cracking, tearing, deformation, or loss of elasticity. A compromised gasket allows cold air to leak out continuously, leading to temperature instability and increased energy consumption. Replace damaged gaskets promptly; they are relatively inexpensive compared to the cost of spoiled inventory.
Staff Training
Train every team member who interacts with the commercial fridge on proper usage — including correct stocking procedures, minimal door-open times, appropriate cleaning products, and how to recognize early warning signs of malfunction like unusual noises, ice buildup, or visible condensation on the exterior.
How to Clean and Sanitize Your Commercial Fridge
Proper cleaning and sanitization go beyond aesthetics — they are fundamental to food safety compliance and the long-term reliability of your equipment. A systematic cleaning approach ensures no area is overlooked and keeps your commercial fridge operating in optimal hygienic conditions.
Prepare the Fridge
Switch off the unit or set it to defrost mode. Remove all stored products and place them in an alternative cold storage location to maintain their temperature. Take out all removable shelves, drawers, bins, and any other detachable components so every surface can be accessed.
Empty and Remove All Contents
Discard any expired, spoiled, or suspect food items. Organize remaining products by type and label them with the date before transferring to temporary storage. This is also a good opportunity to audit your inventory and remove anything past its prime.
Remove Shelves and Drawers
Pull out every shelf, drawer, tray, and rack. Soak them in warm soapy water while you clean the interior walls and floor of the fridge. Removable parts are much easier to clean thoroughly outside the unit.
Clean Interior Surfaces
Wipe down the entire interior — walls, ceiling, floor, and door interior — using a solution of warm water and mild detergent or a food-safe commercial cleaner. Pay special attention to corners, drain channels, and areas around the evaporator fan where debris tends to collect.
Clean Drains and Channels
Locate the drain opening and clear it of any blockages using a soft pipe cleaner or warm water flush. Clogged drains cause water to pool inside the fridge, leading to bacterial growth, ice formation on the evaporator, and unpleasant odors that can transfer to stored food.
Clean Door Gaskets and Handles
Carefully clean the door gaskets with warm soapy water and a soft cloth. Avoid harsh chemicals or abrasive scrubbers that can degrade the rubber. Clean and sanitize the handles as well, since they are touched constantly and are a primary vector for cross-contamination.
Sanitize Exterior Surfaces
Wipe the entire exterior with a stainless-steel safe cleaner or a solution of mild detergent and water. For stainless steel models, always wipe in the direction of the grain to avoid streaks and micro-scratches. A clean exterior reflects well on your operation and prevents corrosion from grease or acidic spills.
Reassemble and Power On
Once every component is clean and fully dry, reassemble the shelves, drawers, and racks inside the unit. Power the fridge back on and allow it to return to its target temperature before restocking. Verify the temperature with a calibrated thermometer before placing any food back inside.
Record the Cleaning
Document every cleaning session in a maintenance log — the date, who performed it, and any issues observed. This log serves as proof of compliance during health inspections and helps you track patterns that might indicate a developing problem with the unit.
Preventative Maintenance Tips for Commercial Fridges
Preventative maintenance is significantly cheaper than reactive repairs. A few hours of scheduled maintenance each month can save you thousands of dollars in emergency service calls, lost inventory from temperature failures, and the downtime associated with a fridge that is out of commission during peak business hours.
Create a Maintenance Schedule
Build a written maintenance schedule for your commercial fridge. Assign daily, weekly, monthly, and quarterly tasks to specific team members. Post the schedule in a visible location so everyone knows their responsibilities.
Temperature Monitoring
Check and log the internal temperature at least twice daily — once in the morning and once during peak operation. Use a calibrated digital thermometer placed in the warmest spot inside the unit for the most accurate reading.
Clean Condenser Coils
Vacuum or brush the condenser coils every 90 days at minimum. In high-grease environments like commercial kitchens, consider a monthly cleaning schedule. Dirty coils are the single most common cause of premature compressor failure.
Inspect Gaskets and Hinges
Test door seals monthly by placing a piece of paper in the doorjamb and closing the door. If the paper slides out easily, the gasket needs to be replaced. Also check door hinges for looseness and lubricate them if they squeak or resist.
Drain Line Maintenance
Flush the drain lines monthly with a warm water and baking soda solution. Algae and slime can build up inside drain tubes, creating blockages that lead to water leaking onto the floor or pooling under the evaporator coils.
Professional Servicing
Schedule a professional technician to inspect your unit at least once or twice per year. A qualified refrigeration tech can check refrigerant levels, test electrical connections, evaluate compressor performance, and identify wear on parts that are difficult to assess without specialized tools.
Quick Troubleshooting Reference
Before calling a repair technician, run through these common issues and see if a simple fix resolves the problem:
Fridge not cooling properly: Check that the thermostat is set correctly, ensure the condenser coils are clean, confirm adequate ventilation clearance, and verify the door gaskets are sealing properly.
Excessive frost buildup: Inspect the defrost timer and defrost heater. Ensure the door is closing completely and that the gasket isn't compromised. Check whether the evaporator fan is running.
Unusual noises: Rattling or buzzing could indicate loose components, a failing fan motor, or a compressor issue. Identify the location of the noise and investigate accordingly.
Water pooling on the floor: Clear the drain line, check for a clogged drain pan, and make sure the unit is level. Tilted fridges can cause condensation to flow toward unintended areas.
Compressor running constantly: The most common causes are dirty condenser coils, a faulty thermostat, low refrigerant levels, or damaged door gaskets. Address each possibility systematically.
Choosing the Right Repair Service for Your Commercial Fridge
When your commercial fridge needs professional attention, choosing the right repair service matters as much as the repair itself. A poor choice in technician can lead to recurring problems, voided warranties, and unnecessary replacement costs. Take the time to evaluate your options carefully before committing to a service provider.
Importance of Professional Repair Services
Commercial fridges contain pressurized refrigerant systems, high-voltage electrical components, and precision-calibrated control boards that demand specialized knowledge. A certified technician brings the right diagnostic tools, factory-approved replacement parts, and hands-on experience that general handymen simply don't have. Professional service also ensures the repair is documented properly, preserving your warranty coverage and satisfying any regulatory inspection requirements.
Factors to Consider When Choosing a Repair Service
Expertise and Certification: Look for technicians who are certified in commercial refrigeration and have documented experience working on units similar to yours. Certifications from industry bodies like EPA Section 608 and HVAC/R trade associations indicate a baseline level of competency and regulatory compliance.
Response Time: A broken commercial fridge is an emergency — especially if it's full of perishable stock. Prioritize repair services that offer same-day or next-day service windows and have a clear after-hours emergency contact process.
Proper Equipment and Parts: A reputable repair service should use genuine OEM parts or certified equivalents and have the specialized diagnostic equipment required for commercial refrigeration systems. Substandard parts might fix the immediate problem but often fail sooner and can void your manufacturer warranty.
Reviews and Reputation: Research online reviews from other commercial kitchen operators and foodservice businesses. Ask for references. A company with a strong track record of on-time arrivals, transparent pricing, and lasting repairs is worth paying a premium for.
Pricing and Transparency: Request detailed, written estimates before any work begins. A trustworthy service provider will break down the costs for labor, parts, and any diagnostic fees upfront. Be cautious of companies that offer vague quotes or refuse to provide a written breakdown of charges.
Warranty on Repairs: Any professional repair service worth hiring should offer a written warranty on their work — covering both the labor and the parts installed. This warranty protects you if the same issue recurs shortly after the repair and demonstrates the company's confidence in its workmanship.
Ready to Upgrade Your Commercial Refrigeration?
Explore our curated selection of commercial-grade refrigerators designed for reliability, energy efficiency, and heavy-duty performance.
Chef AAA - TSM33R Merchandiser Refrigerator