


 Damage
  Loss
Loss  Theft
Theft 


How to Build a DIY Picnic Table
A complete step-by-step guide to crafting your own sturdy, classic A-frame picnic table right in your backyard.
Difficulty
Intermediate
Time to Complete
4 – 6 Hours
Project Cost
$100 – $200
Seats
6 – 8 People
Sitting outdoors on a warm afternoon with family gathered around a homemade picnic table is one of summer's greatest pleasures. If you are looking for a satisfying weekend project that will serve your household for years to come, building your own A-frame picnic table is a rewarding and surprisingly achievable endeavor. This classic design is both sturdy and lightweight enough to reposition whenever the mood strikes.
Follow this comprehensive guide to build a timeless picnic table from scratch. With the right materials, basic power tools, and a free afternoon, you will have a beautiful centerpiece for your outdoor gatherings.
Materials You Will Need
This is an intermediate-level DIY project, so you will need several common power tools. If your workshop is missing any of them, your local hardware store is a great place to check for affordable options or tool rentals.
Tools
- Table saw or circular saw
- Electric drill with 3/8-inch drill bit
- Jigsaw
- Tape measure
- Adjustable wrench
- Pencil and framing square
Hardware & Supplies
- 5/16-inch carriage bolts, washers, and nuts
- 2-1/2 inch galvanized carriage bolts, nuts & washers
- One box of 3-inch deck screws
- One box of 4-inch decking screws
- Wood glue (exterior rated)
- Sandpaper (medium and fine grit)
Lumber Cut List
| Piece | Qty | Length | Material |
|---|---|---|---|
| Tabletop Boards | 4 | 6 feet (2x6) | Pressure Treated Lumber |
| Seat Boards | 4 | 6 feet (2x6) | Pressure Treated Lumber |
| Legs | 4 | 31-1/4 inches (2x6) | Pressure Treated Lumber |
| Table Cleats | 2 | 28 inches (2x4) | Construction Grade Lumber |
| Seat Cleats | 2 | 11 inches (2x4) | Construction Grade Lumber |
| Brace | 1 | 28 inches (2x4) | Construction Grade Lumber |
| Seat Supports | 2 | 67 inches (2x4) | Construction Grade Lumber |
Choosing the Right Wood for Your Picnic Table
When selecting lumber for an outdoor picnic table, you want a species that can stand up to the elements without warping, cracking, or rotting prematurely. Some of the best choices include cedar, redwood, and Douglas fir. These naturally weather-resistant woods are widely available at most lumber yards and offer a great balance of durability and workability.
While hardwood species will certainly last, they add considerable weight and cost to the project. For most backyard builders, pressure-treated softwood is the most practical choice — it resists rot and insect damage at a fraction of the price.
💡 Pro Tip
For the legs, consider using pressure-treated lumber exclusively, since they will come into direct contact with the ground. Cedar or composite decking on the tabletop, however, creates a beautiful, splinter-resistant surface that is pleasant to the touch and naturally rot-resistant.
Once your lumber is selected and delivered, let it acclimate outdoors for a day or two before cutting. This prevents warping after assembly.
How to Build an A-Frame Picnic Table
Follow these eight straightforward steps to complete your project.
Cut and Sand Your Lumber
Begin by measuring and cutting all of your lumber according to the cut list above. Each leg needs to be cut at 1-1/4 inches long from the pressure-treated lumber, and the miter saw should be set to 15 degrees for both the top and bottom ends of every leg.
For the tabletop, cut your four 6-foot-long boards using a circular saw or table saw. Each seat support will be cut at 67 inches in length. Set aside one 28-inch piece for the center brace, which will be trimmed later.
After completing every cut, sand each piece to remove any splinters and smooth rough edges. Use a medium-grit sandpaper first, then follow up with a fine grit. The amount of sanding effort you put in is entirely up to you — but at the very least, ensure the edges and seat surfaces are comfortable enough to sit on.

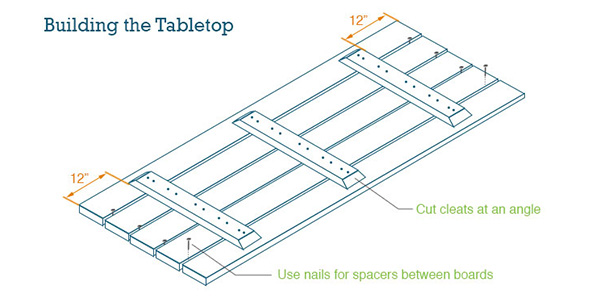
Construct the Tabletop
Lay four of the remaining 6-foot boards on your work surface with the better-looking side facing down, since you will be looking at the underside during assembly. Arrange the boards parallel to each other, making sure each one fits flush to form your tabletop. Create uniform spaces between each board by placing 16-penny nail spacers between them — the gap should be about 1/8 of an inch wide.
Measure the full length of the tabletop to find the center at 36 inches. Install the first cleat in the center, running it perpendicular to the long boards. Predrill your screw holes to prevent the lumber from splitting, and be particularly careful to ensure the cleat is straight. Secure it with 3-inch deck screws.
Then measure 2 inches from each end of the table and repeat the installation process with the second cleat.

Build the Picnic Table Seats
Repeat the process from the tabletop to build the top of the seats. Place two 6-foot-long boards parallel to each other and create a space between them using the nail spacers. Measure the length and find the center of the boards at 36 inches, then use the same technique as you did with the tabletop — place your 11-inch seat cleat and use four screws to attach it.
For the final two cleats, measure 4 inches from each end of the boards and attach them securely. Repeat this entire process to build the second seat bench.
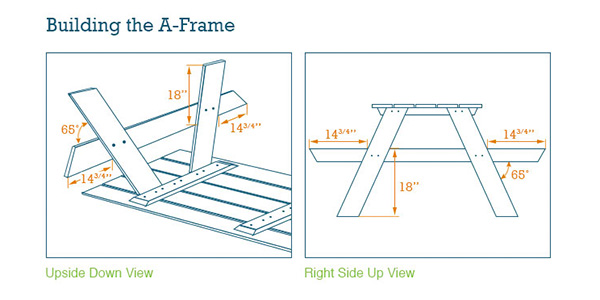
Create the A-Frame Legs
Now it is time to build the A-frame structure, which consists of the table legs and the seat supports. You will need the two 31-1/4-inch leg pieces and the two 11-inch seat support cleats for each A-frame assembly.
Measure 1-3/4 inches from the end of each seat support and mark it with your pencil. Then measure 10 inches up from the bottom of each leg and make another pencil mark. Place each leg so that the 10-inch mark on the leg aligns with the mark on the seat support. The legs should be set at a slight angle to give the A-frame its signature slant — ensure the legs are on an even slope with the seat support.
Attach both legs with a single bolt per leg at opposite ends of the seat support, ensuring that the top of each leg is angled toward each other and the bottom fans outward. The completed assembly should look like the letter "A" when viewed from the side.
Repeat these steps to create the second A-frame assembly using the same measurements as a template.
Attach the Legs to the Tabletop
With your tabletop still upside down on your work surface, begin attaching the completed A-frame leg assemblies. Using the adhesive and clamps, attach the top of the A-frame to the outside of the side cleat. Secure the leg of the A-frame to the outside of the side cleat using a bolt with a nut on the back.
Repeat on the other end of the table.
Cut and Install the Tabletop Brace
Using your tape measure, cut and install the brace between the center of the table legs and the A-frame legs. Measure the distance from the middle cleat to the center of the seat support — it should be approximately 130 to 170 millimeters depending on your exact measurements.
Hold your brace in place and use your pencil to mark where it meets each end. Cut at a slight angle so the brace sits flush. If the braces are too long and push the legs farther apart, trim them down. Once the fit is correct, bolt the brace in at each end using carriage bolts.
Use a level to check that the brace is straight and sits into the middle cleat of the tabletop and the center of the seat support correctly.
Install Carriage Bolts to Strengthen the Frame
To add extra support to the seats and A-frame, install carriage bolts where the legs meet and seat support cross over. Using a drill and 3/8-inch drill bit, bore holes straight through both boards at each connection point. Drop the carriage bolt through, add a flat washer, then a nut, and tighten with an adjustable wrench.
Once you have completed the carriage bolt process, flip your picnic table over so it is standing on its legs.
Attach the Seats
Using the half-inch-by-6-inch carriage bolts, install the seats to the seat supports by placing your seat panels cleat-side down on the seat supports, making sure the seats are evenly centered from front to back and side to side.
Use the 4-inch deck screws to attach the seats to the seat support. Drill into the top of the seats and through the seat supports below. Ensure everything is flush, level, and firmly secured before use.
Finishing Touches & Maintenance
Once your picnic table is fully assembled, give it a final once-over with fine sandpaper to smooth any rough spots caused during construction. Apply an exterior wood stain or sealant to protect the wood from moisture, UV rays, and general outdoor wear. Reapply annually to keep your table looking its best.
If you used pressure-treated lumber, allow it to dry completely for several weeks before staining — the chemicals in freshly treated wood can prevent stain from adhering properly. In the meantime, enjoy your brand-new backyard gathering spot!
Prefer a Ready-Made Frame?
Skip the woodworking on the frame and start with a professional-grade steel picnic table leg kit. Just add your own lumber top and seats.
Pilot Rock Steel Picnic Table KitBuilding your own picnic table is one of the most satisfying outdoor projects you can tackle on a weekend. Not only do you end up with a functional piece of furniture that serves your family for years, but the process itself is genuinely enjoyable and gives you a real sense of accomplishment. Whether you go the fully handmade route or opt for a steel frame kit to simplify the build, you will love the end result — and so will everyone who gathers around it.