CLEARANCE SALE.
ITEMS LEFT.
PEOPLE are also watching that product.


CLEARANCE SALE.
ITEMS LEFT.
PEOPLE are also watching that product.
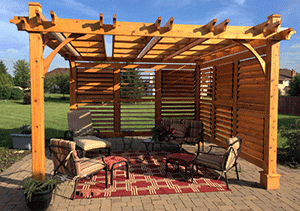
Western Red Cedar Construction Is Environmentally Friendly, Provides Natural Beauty And Is Resistant To Decay And Insects.
120 In. L X 144 In. W Outside Post To Outside Post Dimensions.
Engineered 5 ½ In. X 5 ½ In. Finger-Jointed Cedar Posts Provide An Overall Assembled Height Of 108 In.
138 In. L X 162 In. W Overall Dimensions Including Joist And Girder Overhang.
Includes Notched And Pre-Marked Western Red Cedar Joists.
Includes Notched And Pre-Drilled Western Red Cedar Girders.
Hardware Included Screws, Nails And Lagbolts, Some Stainless Steel Hardware.
4 Sets Of Post Skirting Manufactured From Western Red Cedar To Conceal Post Mount Hardware Included.
Assembly Time Is Approximately 6-8 Hours For 2 Persons Depending On Skill Level.
Western Red Cedar Is Naturally Resistant To Decay And Insects.
Product Ships Unstained.
Accepts A Wide Range Of Finishes To Help You Create A Personalized Look.
Made Entirely With Renewable Resources.
Minimal Tools Required And Hardware Included.
Check With Your Local Building, Zoning And Neighborhood Association To Obtain All Applicable Permits Before Ordering.
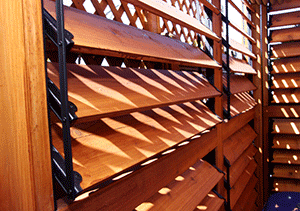
Looking for more privacy? Add a Louvered Panel to any side of your pergola. Keep panels open to let the sunshine in or close easily and quickly for added privacy.


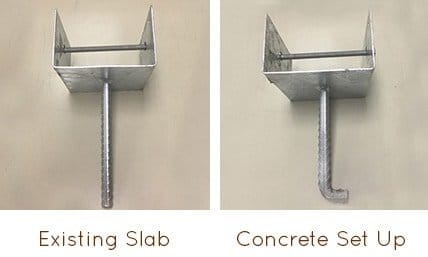
We recommend using a Post Mount Bracket to secure pergola posts to your foundation.
Although the pergola is stable and strong without installing a bracket, installation of the brackets will firm up the structure and lessen the amount of sway that may occur with your structure. In areas of high winds, please check with your local building authority to confirm suitability.

The First Step is to line up your posts with the post mount brackets so you can drill the proper holes. Watch our Lining Up Posts & Brackets video to the right.
Instructions:
Different surfaces will require different styles of post mounts. The Second Step is to follow the specific instructions for either an Existing Slab Installation, or for Concrete Set Up Installation
Kindly be informed that for orders to be shipped outside of the West Coast states, a supplementary fee of $100, as stipulated by our supplier (Outdoor Living Today), will be applicable. Our team will reach out within 24-48 hours post-order placement to discuss delivery particulars. Thank you for your understanding.
Western Red Cedar Construction Is Environmentally Friendly, Provides Natural Beauty And Is Resistant To Decay And Insects.
120 In. L X 144 In. W Outside Post To Outside Post Dimensions.
Engineered 5 ½ In. X 5 ½ In. Finger-Jointed Cedar Posts Provide An Overall Assembled Height Of 108 In.
138 In. L X 162 In. W Overall Dimensions Including Joist And Girder Overhang.
Includes Notched And Pre-Marked Western Red Cedar Joists.
Includes Notched And Pre-Drilled Western Red Cedar Girders.
Hardware Included Screws, Nails And Lagbolts, Some Stainless Steel Hardware.
4 Sets Of Post Skirting Manufactured From Western Red Cedar To Conceal Post Mount Hardware Included.
Assembly Time Is Approximately 6-8 Hours For 2 Persons Depending On Skill Level.
Western Red Cedar Is Naturally Resistant To Decay And Insects.
Product Ships Unstained.
Accepts A Wide Range Of Finishes To Help You Create A Personalized Look.
Made Entirely With Renewable Resources.
Minimal Tools Required And Hardware Included.
Check With Your Local Building, Zoning And Neighborhood Association To Obtain All Applicable Permits Before Ordering.
Looking for more privacy? Add a Louvered Panel to any side of your pergola. Keep panels open to let the sunshine in or close easily and quickly for added privacy.


We recommend using a Post Mount Bracket to secure pergola posts to your foundation.
Although the pergola is stable and strong without installing a bracket, installation of the brackets will firm up the structure and lessen the amount of sway that may occur with your structure. In areas of high winds, please check with your local building authority to confirm suitability.

The First Step is to line up your posts with the post mount brackets so you can drill the proper holes. Watch our Lining Up Posts & Brackets video to the right.
Instructions:
Different surfaces will require different styles of post mounts. The Second Step is to follow the specific instructions for either an Existing Slab Installation, or for Concrete Set Up Installation
Kindly be informed that for orders to be shipped outside of the West Coast states, a supplementary fee of $100, as stipulated by our supplier (Outdoor Living Today), will be applicable. Our team will reach out within 24-48 hours post-order placement to discuss delivery particulars. Thank you for your understanding.
